Did you know that searches for “mid century wall decor” have increased by 250% since 2020?
I remember the first time I made a mid-century home – the wall decor absolutely looked awesome.
The clean lines, organic shapes, and bold geometric patterns created such a striking visual impact.
As someone who’s spent years collecting and creating mid-century modern wall art, I’m excited to share everything I’ve learned about transforming blank walls into retro masterpieces.
Essential Elements of Mid Century Wall Decor
Walking into my first client’s home, I knew immediately their walls needed that quintessential mid century modern touch.
My years of experience have taught me that authentic mid century modern wall decor revolves around a few key elements: geometric patterns, sunburst designs, abstract art, and organic shapes inspired by nature and atomic age motifs.
The most crucial element I’ve found in mid-century modern wall decor is the emphasis on clean lines and minimalist design – something that took me ages to truly master through trial and error.
Material for mid century modern wall
I’ve discovered that successful mid-century modern wall decor typically incorporates materials like teak wood, brass, and walnut.
These materials create that warm, sophisticated look that’s become synonymous with the style. Through countless home transformations, I’ve learned that mixing these materials creates the most authentic feel.
Working with various clients over the years, I’ve noticed that the most successful mid century modern wall arrangements always include a mix of three key components: something geometric, something organic, and something with a strong visual punch.
It’s like following a recipe – once you know the basic ingredients, you can start experimenting with different combinations to create your own unique look that still feels authentically mid century.
It’s absolutely fine to mix high-quality reproductions with vintage pieces, as long as you maintain the core design principles of the era.
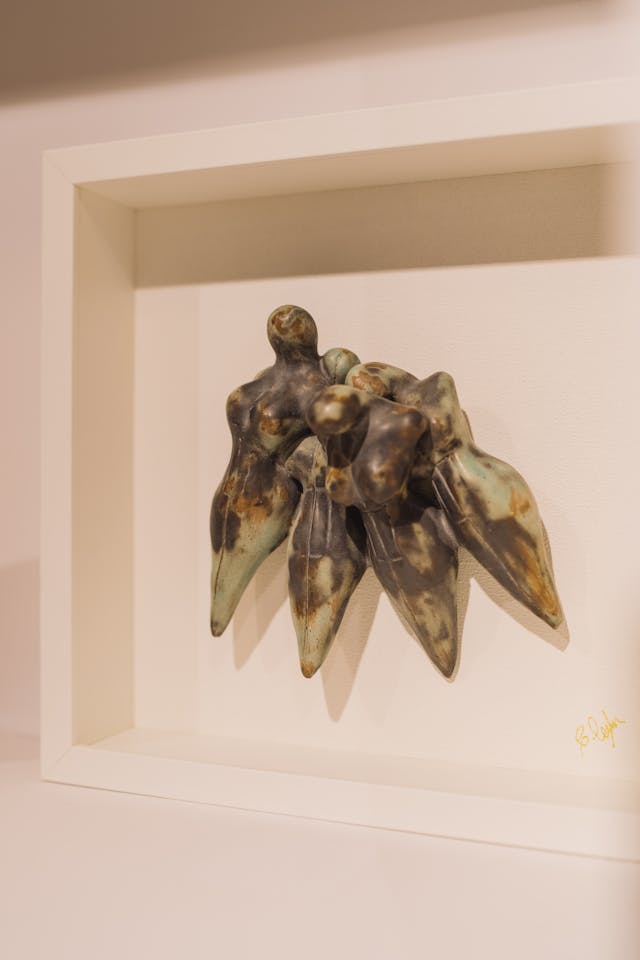
One of my favorite tricks is to incorporate wall-mounted sculptures or three-dimensional art pieces – they add that extra layer of visual interest that flat prints just can’t achieve on their own.
Authentic vs. Reproduction Pieces
Let me tell you about my biggest rookie mistake – dropping $800 on what I thought was an authentic mid century modern wall sculpture, only to discover it was a reproduction worth about $150!
Aesthetic pieces
That expensive lesson taught me to look for specific markers of authentic pieces: original hardware, appropriate patina, and manufacturer’s marks that match the era. These details have saved me from making similar mistakes countless times since then.
When examining potential pieces for clients, I’ve developed a foolproof authentication process that starts with checking the materials and construction methods typical of the era.
I’ve found that some reproductions can actually be better choices than originals, especially for functional pieces or in homes with young children.
Through working with countless clients, I’ve learned that mixing authentic and reproduction pieces often creates the most practical and visually appealing results.
Reproduction pieces

The key to selecting quality reproductions lies in understanding the original design principles and materials used during the mid-century modern period.
I’ve discovered that the best reproductions honor these principles while incorporating modern manufacturing techniques that can actually enhance durability and longevity.
It’s fascinating to see how modern craftsmen have adapted these iconic designs for contemporary homes.
Price points can vary wildly in both authentic and reproduction pieces, but I’ve learned that the sweet spot for reproduction wall art typically falls between $200-500 for larger pieces. This range usually ensures decent quality while maintaining reasonable affordability.
One thing I always tell my clients – it’s better to have a high-quality reproduction than a poorly maintained or damaged authentic piece.
DIY Mid Century Modern Wall Art Ideas
Sometimes the best wall art comes from your own hands! My first DIY mid century modern wall project was honestly a disaster.
Working with simple materials like plywood, paint, and basic geometric shapes, I’ve managed to create some stunning wall pieces that look surprisingly authentic.
The key is planning your design carefully before starting and using colors typical of the era.
I’ve discovered that creating your own sunburst mirror can be surprisingly straightforward using wooden dowels, a circular mirror, and some metallic spray paint.
This project has become one of my go-to recommendations for clients on a budget.
Simple tools like a protractor and level become your best friends when creating geometric wall art. The attention to detail really makes the difference between a piece that looks professional versus obviously handmade.
One of my favorite DIY projects involves creating abstract wall sculptures using bent plywood and paint.
It took some trial and error to get the technique right, but the results can be amazing!
I’ve found that using a steam box to bend the wood creates those gorgeous organic curves that are so characteristic of modern mid century wall decor. The process requires patience, but the end result is always worth it.
The most important lesson I’ve learned with DIY mid century wall decor projects is to embrace imperfection while maintaining clean lines. Even the original designers of the era had slight variations in their work.
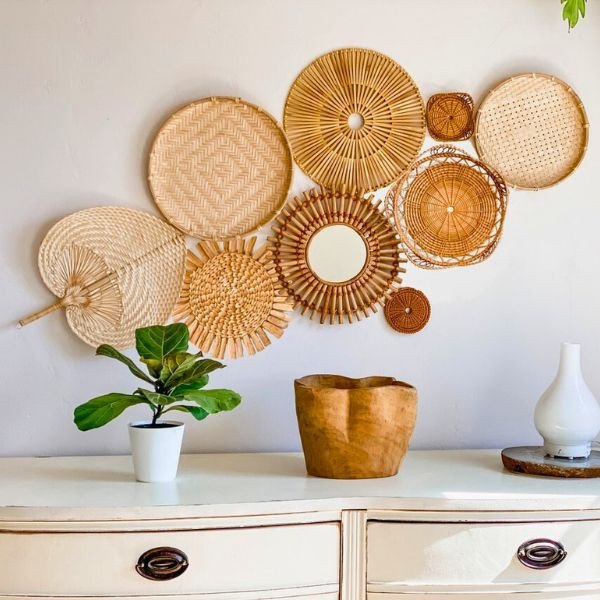
Creating a Balanced Gallery Wall

My first attempt at a mid-century modern gallery wall looked like a chaotic mess of random pieces stuck to the wall.
Through years of trial and error, I’ve discovered that the key to a successful mid-century gallery wall lies in varying the sizes and shapes while maintaining consistent spacing between pieces. Typically, I aim for 2-3 inches between frames.
The secret sauce to a perfect gallery wall is starting with one dominant piece that serves as an anchor. This piece should be approximately 1.5 times larger than the other items in your arrangement.
I’ve learned that laying out your gallery wall on the floor first is absolutely essential. Take photos from above to get a better perspective – this trick has saved me countless holes in the wall!
Sometimes what looks perfect at eye level needs adjusting when viewed from different angles.
Go Symmetrical
Creating balance doesn’t mean everything needs to be symmetrical – in fact, some of my most successful gallery walls have been asymmetrical arrangements that still feel balanced due to careful consideration of visual weight.
I love playing with different frame materials, mixing woods like teak and walnut with brass or black metal frames. The key is to repeat these materials throughout the arrangement to create cohesion.
Gallery template
One technique that’s never failed me is using a paper template system. I trace each piece onto kraft paper, mark the hanging points, and tape these templates to the wall before hanging anything.
My clients are often surprised when I tell them that a well-executed gallery wall typically takes several hours to plan and install properly. Rushing the process almost always leads to regret.
Color Schemes and Pattern Combinations
I still remember staring at my first mid-century modern wall design project, completely overwhelmed by color choices.
The breakthrough came when I discovered the classic mid-century modern color palette: mustard yellow, teal blue, tangerine orange, and warm walnut browns.
These colors form the foundation of most successful mid-century wall designs I’ve created, with warm neutrals acting as the perfect backdrop.
The 60-30-10 Rule
After years of experimenting, I’ve found that the most successful pattern combinations usually include one geometric pattern, one organic shape, and one solid piece to give the eye a place to rest.
Working with patterns can be tricky, but I’ve developed a foolproof approach: start with a 60-30-10 rule.
Use your main color or pattern for 60% of the wall space, a secondary choice for 30%, and an accent for the remaining 10%. This formula has saved me from countless design disasters!
Mixing Pattern Scales
When combining different patterns in a mid-century modern space, scale becomes incredibly important.
I’ve learned through trial and error that mixing different sized patterns – like a large geometric print with smaller atomic starbursts – creates visual interest without overwhelming the space.
The key is maintaining enough negative space between patterns to let each design element breathe and speak for itself. This approach has transformed some of my most challenging projects into stunning successes.
Common Mistakes to Avoid
My biggest wall decor disaster happened when I tried to cram too many pieces into one space – it looked more like a cluttered antique shop than a curated mid century wall decor display.
After helping countless homeowners, I’ve noticed that many people rush their wall decor decisions without considering the room’s overall design.
The best mid-century modern walls complement the furniture and accessories rather than competing with them. Through years of experience, I’ve learned that successful wall decor should enhance the space, not overwhelm it.
Not Securing Wall Pieces Properly
I made the mistake early in my career of not properly securing heavy wall pieces, leading to some nerve-wracking close calls.
Now I always use appropriate anchors and check weight limits carefully. Professional installation might cost more upfront, but it’s worth every penny when you’re dealing with valuable vintage pieces or large-scale art installations.
Lighting and Hanging
Poor lighting placement can cast unflattering shadows or create glare on glass-framed pieces – a mistake I see all too often in otherwise beautifully designed spaces.
Nothing makes me cringe more than seeing mid-century modern wall decor hung too high or too low – it’s crucial to consider viewing angles and furniture placement when deciding on height.
Start as a journey
Remember that building your mid-century modern wall decor collection is a journey, not a race.
I’ve seen the most stunning results come from people who took their time, carefully selecting pieces that spoke to them while staying true to the core principles of mid-century design.
Through each installation and project, I’ve discovered that authenticity comes not just from the pieces themselves, but from how thoughtfully they’re combined and displayed.
The beauty of mid-century modern wall decor lies in its versatility. Whether you’re working with authentic vintage pieces, high-quality reproductions, or DIY creations, the key elements remain the same: clean lines, organic shapes, and intentional design choices. Trust me, I’ve seen incredible spaces created with modest budgets and careful planning.
The Journey to Perfect Wall Decor
I encourage you to start your own mid-century modern wall decor journey.
Remember, some of the most iconic mid-century designs started as experiments! Share your creations in the comments below – I’d love to see how you interpret these timeless design principles in your own space.
And please, don’t forget about proper installation techniques and safety measures.
Nothing ruins the perfect mid-century modern vibe quite like a damaged wall or broken piece. If you’re unsure about hanging heavier items, always consult a professional.
Stay groovy, and happy decorating!